
So here’s the lowdown on the big kitchen redo.
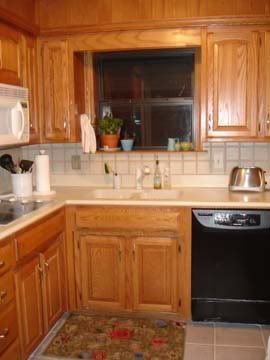
Here’s the before picture. Some people enjoy oak, some people can make it work…I found it completely suffocating. I dreamed of clean, crisp, ivory cabinets, and I finally thought “Hey, what’s holding me back here?!”. So I finally just did it, and I'm sooo glad I did.
Step 1:
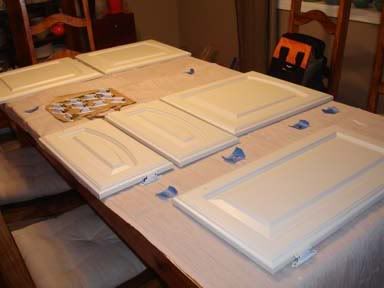
I removed the doors, numbering each of them and making a map so it would be a piece of cake to reinstall them. See those numbers on the blue tape? I made sure they were next to their door at all times.
I removed the doors, numbering each of them and making a map so it would be a piece of cake to reinstall them. See those numbers on the blue tape? I made sure they were next to their door at all times.
Step 2:
I cleaned and lightly sanded the doors and cabinet frames and then applied Gripper brand primer. I let the primer dry 24 hours before applying the first coat of paint. I know it’s tempting to paint sooner, but don’t!...go to a movie, have a hot bath, take the kids to McDonalds, but don’t touch those cabinets before 24 hours are up.
I cleaned and lightly sanded the doors and cabinet frames and then applied Gripper brand primer. I let the primer dry 24 hours before applying the first coat of paint. I know it’s tempting to paint sooner, but don’t!...go to a movie, have a hot bath, take the kids to McDonalds, but don’t touch those cabinets before 24 hours are up.
Step 3…4…5 (honestly, this step feels like it will never end, but hang in there!)
I applied 3 coats of satin latex paint (I used Ralph Lauren Architectural Cream) to the cabinet frames and doors, allowing at least 4 hours between each coat - even more is better. However, I’ve since heard that oil based paint is much more durable, and if I needed to paint cabinets again I think I’d go that route – but if you go with latex you’ll still be in good shape.
Step 6:
I applied one coat of clear, non-yellowing polyacrylic topcoat to make the finish more durable. I know…you don’t want to paint one more stroke at this point, but believe me, it’s worth it.
Step 7:
Reinstall cabinets and be so thrilled with yourself that you numbered and mapped out the cabinet placement…oh yeah, you’re a rockstar!
Step 8:
Install some fabulous cabinet hardware. I bought mine for a steal on eBay. I think it was $1-$2 per knob or pull! It’s worth it to do some searching for the right hardware for the right price.

Step 9:
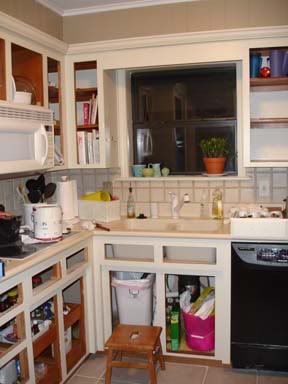
Then enjoy, enjoy, enjoy!


This whole process took me about 2 weeks of evenings and weekends, and I thought I was going to die at moments, but IT WAS WORTH IT! I honestly think it helped our house sell. Seriously, our house sold in 1 week, in THIS market!
I hope this helps!
I absolutly love your cabinets. I too have oak. I want to paint them, but I am so scared to do it. I keep thinking, "I paid so much money to get Oak, I can't cover it up". Plus I just spent a couple of weeks last summer refinishing them.
ReplyDeleteAfter I get over the fear, I think I see painted cabinets in my near future.
I still can't get over what a difference this made. It looks so fabulous!!!
ReplyDeleteWhat a big difference! In our old house we painted our oak cabinets white! I know what you mean about wanting to die at times! :-)
ReplyDeleteTruly amazing what a little paint and some elbow grease can do. I love the transformation you did. I love the difference it made in my kitchen. And all those people who said, "Are you sure about that?" love it!! Such a fun way to totally change your kitchen.
ReplyDeleteEverytime I see these cabinets I smile. I remember how much work they were for ya but man do they look great!! That kitchen was transformed!
ReplyDeleteAnNicole, I remember when you did this. It turned out so beautiful. I am glad you shared the process in blogland. That was very nice of you. I can't wait to see your blck door.
ReplyDeleteHugs, Terrie
P.S. Please stop by my blog sometime and say, HI!
Wow, it seriously looks like a completely different kitchen! Great job!!
ReplyDeleteThank you so much for laying out the process! I have a home I like, in a neighborhood I love, with a kitchen I hate! But it has such potential and I intend to give it a make-over this summer. This will be such a help!
ReplyDeleteI remember when you did this and how amazed I was. The tutorial really breaks it down well!
ReplyDeleteI was glad to see your wrreath on Tip Junkie!
The results are stunning! I just finished painting the cabinets in my boys' bathroom, and it is a time consuming project, but it is sooo worth it!!
ReplyDeleteFantastic... I too redecorate my kitchen with lovely stuff which got from WalMart...
ReplyDeleteI can't believe what you did with your kitchen! Someone get me some sandpaper and some primer - I'm off to the kitchen and I might be some time...
ReplyDeleteWOW! I think this is one of the best kitchen cabinet transformations that I've seen! It looks as if they were that color to begin with! Job well done! I'm totally jealous! :) I want to do mine!
ReplyDelete~Karla
The paint has made it look so much more open. I'm kind of scared to paint mine. I do the whole what if's. Maybe one day I will get the ambition to do so. But in the mean time, I will admire yours.
ReplyDeleteOk, I know I already commented on this post, but I was reading your more recent post that linked back to this tutorial and I have to say - you are my hero! I hope to someday be just like you! :) LOL! I so badly want to paint our dated oak kitchen cabinets. Maybe someday...
ReplyDelete~Karla
GREAT JOB!!! I love the look of the creamy white cabinets. Mine just got painted black... I love both ways! And you're right, oak is good for some people but not everyone can pull it off. I also think it depends on the type of cabinet style... the more simple, the better (so the oak doesn't contrast!). :)
ReplyDeletewhat color did you paint your walls. Great job.
ReplyDeleteThe valance on the window is fabulous! Where's it from?
ReplyDeleteas kati (above) said, the valance on the window is fabulous! can you tell me too where it is from or where you got the fabric? i'm looking for something simple for my bear kitchen window.
ReplyDeleteAbsolutely wonderful selection of those cabinets!! Your kitchen is looking totally different and beautiful... Love it!!
ReplyDeleteBeautiful!
ReplyDeleteSo much better...amazing!
ReplyDeleteWaawaaawow!!! I can't believe the transformation. They look amazing. Don't you just feel like a new woman? Here's a big hug from me to thank you for linking with us.
ReplyDeleteWhat's funny is that I was just on your blog this weekend admiring your door (I think I found you from PinkandPolkaDot)....so imagine how excited I was to see you here...at my little party!
Much love to you,
Miss Edie
Love it. I have oak...but flat panel - oh, how I wish the previous owner had at least sprung for raised panel oak!! It looks so yummy painted!
ReplyDeleteHey girl, I was enjoying your Blog again! When I got to that paint can I thought, "That's my paint" then..."Hey, that's my HAND!!!". Laughing. I still love that stuff. You've done great on your new home!!! Marti (a_gatorgirl on RMS). ~:o)
ReplyDeleteYour cabinets look GORGEOUS! I so want to do that to mine, but I'm afraid my husband may kill me! We just bought this house a month ago and the kitchen cabinets are brand new....but white would look so pretty!
ReplyDeleteHi
ReplyDeleteYour cabinets look amazing! I just had to post because your technique is exactly like mine and I have a business painting kitchen cabinets and furniture. I was so excited to see others using the same method. Oil based paint is more durable but really a pain to use and boy is it smelly. Water based works really well especially since you sealed them with a polyurithane. Really beautiful kitchen.
I am drooling over this redo ya know!
ReplyDeleteNow that is AMAZING! i LOVE your BLOG! You have done everything I am just about to do, thanks for all the tips and I will BE SURE to feature you on my new blog starterhometodreamhome.blogspot.com (adding you to my blog roll as we speak). You just may have motivated me to paint those nasty cabinets I just posted about! haha
ReplyDeleteHey Anni..I did this in our Houston house many years ago. I got quotes of $3,000- $4,500 to paint my kitchen cabinets and I did it for $350. I had many more doors and cabinets to paint ;-( I did use oil base paint and if you thought you would go crazy with latex, you would have hated working with oil. It takes FOREVER to dry! The result was fabulous and it helped sell our home also. I have also painted laminate in my current Virginia house. I used a new product called GRIPPER which is made to be used over slick type surfaces..no sanding needed. Worked great and dried fast as it is water based. Amazing what you can do with a little imagination and elbow grease.
ReplyDeleteYour kitchen looks beautiful!! I'm about to attempt painting our cabinets and wanted to ask if you had any issue with the wood grain showing through? I've read there are products to mask it, but they can be expensive and even more time consuming. Since yours turned out lovely, I figured I'd ask the expert :)
ReplyDeleteThanks,
Colleen
Hi Colleen - I'll leave a comment on your blog too, but as far as the wood grain goes I couldn't see the actual light and dark of the wood grain once I painted it. A little bit of texture may have still been there, but that didn't bother me. If you're really concerned about the texture of wood grain showing I'd use a bit of spackle over the surface and sand before priming.
ReplyDeleteGood luck!
I want to thank you, thank you, thank you, for the step by step. I have been looking for the fully skinny and you have provided. Two thumbs up An Nicole!
ReplyDeleteThat is an amazing transformation!!! I've never been to your blog before and am enjoying wandering through it.
ReplyDelete- The Tablescaper
My husband and I ventured out and painted our cabinets last week. What a project but so so so worth it! I hated my honey oak cabinets. Here's my dilemma... I didn't use polyurithane on the top. Now that I read this, I'm wondering if I should have. What are your thoughts on this? Do you think there's some sort of spray sealant I could use? I'm stressing now!
ReplyDeleteWow, I so love the new kitchen! So different!
ReplyDeleteI just found this tutorial . . . what a difference!!! I am going to do this to my cabinets . .. wish me luck!!
ReplyDeleteYour cabinets look great! I'm wondering what color your countertop is - is it white, or more tan? I want to paint our cabinets a light color, but our countertops are very light (white with tan-ish swirls) and I'm feeling more confident painting cabinets than the laminate! Is the lightness too much, or do you like it?
ReplyDeleteI love the cabinets! One question - what color are your countertops in the pictures? We're looking to paint our cabinets a white/ivory, but our countertops are very light, too and we don't want to paint that at this point. Is the lightness okay, or do you wish you had more contrast?
ReplyDeleteGreat inexpensive update!! I love great updates that are full of creativity and easy on the budget. Thought you might enjoy seeing my laundry room update.. under 30.00!
ReplyDeleteRobyn Smyles
http://robynsmyleshome.blogspot.com/
Wow- The difference is amazing and I am sure it helped to sell your home.
ReplyDeleteI'm new here ... Shabby Nest listed you as one of her top referrers ... and this $100 makeover is crazy!!!! Just love it and pinned it!
ReplyDeleteI'd love to know the color you have on your dining room walls. Please post the color for us. :) Thanks in advance.
ReplyDeleteLilylu
Great Job and I love the price! I'm looking at our local MLS listings (some homes have been ont he Market for months and years) I WISH they could see your blog.
ReplyDeleteyup, I see a cabinet makeover in my future !!! I LOVE the kitchen. I have a orange toned oak kitchen and can't stand it...Can't wait to get going with this project.
ReplyDeleteLove this! I rent my home and the kitchen is laid out almost exactly like yours. Unfortunately, the homeowner also painted it hunter green and I am DESPERATE to paint it and can't! Hoping it turns into a lease to own situation and I can change it totally and your tips are going to help SO much!
ReplyDeleteHello! So, you didn't have to remove the items from your cabinets? I am blown away! We are about to start painting our cabinets but have been putting it off because of how much work it would involve to clear the cabinets. Do you mind that the insides are still oak?
ReplyDelete-Stephanie
intoourhome.blogspot.com
I did the same thing in my kitchen and then had them antiqued and sanded a little...I love them!
ReplyDeleteBeautiful! I really love the change in your kitchen! -- Lauren from Mom Home Guide
ReplyDeleteRecently new homeowners, what kind of paint brushes should I get?
ReplyDeleteThis comment has been removed by the author.
ReplyDeleteI absolutely LOVE what you did with your kitchen! you are amazing.
ReplyDeleteFurniture Store Denver
Kitchen Cabinets Parker
It looks absolutely gorgeous!!! LOve your new kitchen!
ReplyDeleteCleveland Kitchen Cabinets
It looks SO GOOD! Like a picture from a magazine! thanks for sharing
ReplyDeletePoulin Design Center
Kitchen Cabinet Santa Fe